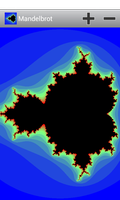
This example shows how a menu and a simple custom view can be combined to create an application with graphical content.
The application is a simple Mandelbrot set viewer that provides controls for zooming in and out, and it responds to touches to allow the user to centre the view on a particular area of the set.
We import a number of standard Java and Android classes which we need for the example, either for creating objects or to define interfaces.
from java.lang import Double, Math, String
from android.app import Activity
from android.content import Context, SharedPreferences
from android.content.res import Resources
from android.graphics import Bitmap, Canvas, Color, Paint
from android.os import Bundle
from android.view import Menu, MenuItem, MotionEvent, View, Window
We also import a resource object from a special module that is created for us by the build script. This object is used as a container of predefined data and constants.
from app_resources import R
The main class in the application is MandelbrotActivity which is derived from the standard Activity class. This contains the methods used to respond to high level events from Android, such as those that tell the application to set up its user interface, pause when the user navigates away from it, and resume when the user returns.
Android creates an instance of this class when it starts the application.
class MandelbrotActivity(Activity):

    def __init__(self):

        Activity.__init__(self)
The initialisation method simply needs to call the corresponding method in the base class.
The onCreate method is called when the activity is created by Android. The return type and parameter types expected by the method are declared using the following decorator. Again, we must call the corresponding method in the base class.
    @args(void, [Bundle])
    def onCreate(self, bundle):

        Activity.onCreate(self, bundle)
Since we want to provide menu items, we need to obtain the action bar that Android provides for our activity. The menu itself will be populated when Android calls the onCreateOptionsMenu method.
        window = self.getWindow()
        window.requestFeature(Window.FEATURE_ACTION_BAR)
The user interface contains a custom view which we will define later. If the application has been run before there should be existing preferences stored for the view, and we restore these before making the view the main element of the user interface.
        self.view = DrawView(self)
        # Restore persistent preferences for the view.
        preferences = self.getPreferences(Activity.MODE_PRIVATE)
        self.view.restorePreferences(preferences)

        self.setContentView(self.view)
The onCreateOptionsMenu method is called by Android to allow us to add items to the activity's menu. We use the Menu object supplied to add two actions to the menu, and we return True to indicate that the menu should be shown.
    @args(bool, [Menu])
    def onCreateOptionsMenu(self, menu):

        item = menu.add(Menu.NONE, 1, Menu.NONE, "Zoom in")
        item.setIcon(R.drawable.zoom_in).getItemId()
        item.setShowAsAction(MenuItem.SHOW_AS_ACTION_IF_ROOM)
        item = menu.add(Menu.NONE, 2, Menu.NONE, "Zoom out")
        item.setIcon(R.drawable.zoom_out)
        item.setShowAsAction(MenuItem.SHOW_AS_ACTION_IF_ROOM)
        return True
Note that we refer to resources using the constants provided by the R object that we imported from the special app_resources module. These correspond to two icons that have been provided for a number of different screen resolutions.
When a menu item is selected the following method is called with the corresponding MenuItem object as the argument. We compare the item's ID with the ones we created in the previous method and call the corresponding methods of our custom view to zoom in or out. We return True if we handled the item selection, or False if we didn't recognise the item.
    @args(bool, [MenuItem])
    def onOptionsItemSelected(self, item):

        if item.getItemId() == 1:
            self.view.zoomIn()
        elif item.getItemId() == 2:
            self.view.zoomOut()
        else:
            return False

        return True
If the user navigates away from the activity, the onPause method is called. This gives the activity the chance to save some state in case the activity is shut down without being resumed. We must call the base class's onPause method, but we also save the current state of the view in the activity's preferences to make it persistent.
    def onPause(self):

        Activity.onPause(self)
        # Save persistent preferences for the view in case the application is
        # shutdown.
        editor = self.getPreferences(Activity.MODE_PRIVATE).edit()
        self.view.savePreferences(editor)
        editor.commit()
The onResume method only needs to call the base class's implementation. If the activity was not shut down then there is no need to restore the view from the activity's preferences. This method could be omitted.
    def onResume(self):

        Activity.onResume(self)
The DrawView class is derived from the standard View class and represents a custom user interface element. In this example, it is used to draw part of a Mandelbrot set.
class DrawView(View):

    __fields__ = {"ox": double, "oy": double, "length": double, "high": int}
The class has a number of attributes which need to be declared so that the compiler can use the correct types when referring to them. These describe the coordinates in the set that we will display in the centre of our view, the extent of the area to be drawn, and the upper limit on the number of iterations we allow when calculating each value.
The initialisation method calls the corresponding method in the base class, as required. We also define a default background colour. Note that we didn't need to declare this in the above dictionary because this is the first time that we refer to this attribute and we are explicitly declaring its type.
    @args(void, [Context])
    def __init__(self, context):

        View.__init__(self, context)
        self.paint = Paint()
        self.paint.setARGB(255, 255, 255, 255)
The onSizeChanged method is called before anything is displayed in the view and after any later change in its size. When called, we use this opportunity to create a bitmap that will hold the values for each coordinate in the Mandelbrot set that we examine. We calculate the scale factor that transforms view coordinates into set coordinates and draw the portion of the set that we are interested in.
    @args(void, [int, int, int, int])
    def onSizeChanged(self, width, height, oldWidth, oldHeight):

        self.bitmap = Bitmap.createBitmap(width, height, Bitmap.Config.RGB_565)

        smallest = Math.min(width, height)
        self.scale = self.length/smallest

        self.drawMandelbrot(0, 0, width, height)
The onDraw method is responsible for painting the contents of the view. As with other handler methods, we call the base implementation. We also use the canvas object supplied to draw the bitmap created in the previous method.
    @args(void, [Canvas])
    def onDraw(self, canvas):

        View.onDraw(self, canvas)

        canvas.drawBitmap(self.bitmap, 0, 0, self.paint)
The method that draws a portion of the Mandelbrot set accepts coordinates in the bitmap's coordinate system that describe the upper left and lower right corners of the rectangle in the bitmap that needs to be updated. The coordinates in the set's coordinate system are calculated using the scale factor that was determined in the onSizeChanged method.
    @args(void, [int, int, int, int])
    def drawMandelbrot(self, x1, y1, x2, y2):

        w2 = self.bitmap.getWidth()/2
        h2 = self.bitmap.getHeight()/2

        y = y1
        while y < y2:

            i = self.oy + ((h2 - y) * self.scale)

            x = x1
            while x < x2:

                tr = r = self.ox + ((x - w2) * self.scale)
                ti = i

                count = 0

                while count < self.high:
                    temp = (tr*tr) - (ti*ti) + r
                    ti = (2.0*tr*ti) + i
                    tr = temp

                    r2 = (tr*tr) + (ti*ti)
                    if r2 > 4.0:
                        break

                    count += 1

                low = self.high - 16
                if count < low:
                    self.bitmap.setPixel(x, y, Color.rgb(0, 0, 255))
                elif count < self.high:
                    c = count - low
                    if c <= 7:
                        g = c * 36
                    else:
                        g = (15 - c) * 36
                    self.bitmap.setPixel(x, y, Color.rgb(c * 17, g, 255 - (c * 17)))
                else:
                    self.bitmap.setPixel(x, y, Color.BLACK)
                x += 1

            y += 1
When the user interacts with the view, the onTouchEvent method is called with an event that describes what happened. We only respond to events that describe a press on the screen, centering the view on the point described by the event. We return False for all other events to allow other components to handle the event.
Note that we invalidate the view, causing the onDraw method to be called again before returning True to indicate that we handled the event.
    @args(bool, [MotionEvent])
    def onTouchEvent(self, event):

        if event.getAction() != MotionEvent.ACTION_DOWN:
            return False

        w = self.bitmap.getWidth()
        h = self.bitmap.getHeight()
        x = event.getX()
        y = event.getY()

        self.ox += self.scale * (x - (w/2))
        self.oy += self.scale * ((h/2) - y)

        self.drawMandelbrot(0, 0, w, h)
        self.invalidate()
        return True
If the user pressed one of the icons that we defined in the activity's options menu then the corresponding method below will be called. These adjust the extent of the region of the Mandelbrot set that will be shown in the view as well as adjusting the maximum number of iterations that the calculation process will allow.
    def zoomIn(self):

        self.length /= 2.0
        self.scale /= 2.0
        self.high += 4
        self.redraw()

    def zoomOut(self):

        self.length *= 2.0
        self.scale *= 2.0
        self.high = Math.max(self.high - 4, 16)
        self.redraw()
Both of the above methods call the following common redraw method in order to update the view with new data.
    def redraw(self):

        w = self.bitmap.getWidth()
        h = self.bitmap.getHeight()
        self.drawMandelbrot(0, 0, w, h)
        self.invalidate()
The final two methods are called when the activity needs to restore or save the view's persistent state. The restorePreferences method parses the stored data and initialises the attributes that describe the view onto the Mandelbrot set. The savePreferences method takes the values of the attributes and writes them to persistent storage using an Editor interface.
    @args(void, [SharedPreferences])
    def restorePreferences(self, preferences):

        self.ox = Double.parseDouble(preferences.getString("ox", "-0.5"))
        self.oy = Double.parseDouble(preferences.getString("oy", "0.0"))
        self.length = Double.parseDouble(preferences.getString("length", "2.0"))
        self.high = preferences.getInt("high", 16)

    @args(void, [SharedPreferences.Editor])
    def savePreferences(self, editor):

        editor.putString("ox", String.valueOf(self.ox))
        editor.putString("oy", String.valueOf(self.oy))
        editor.putString("length", String.valueOf(self.length))
        editor.putInt("high", self.high)